補充「利用WORD打印小冊子的說明」(圖示)
看了昨天的「利用WORD打印小冊子的說明」,我想做一些補充,方便同修打印。用WORD打印小冊子,最麻煩的是頁數的計算。若小冊子總共的頁數改變了,我們打印的時候就要全部重新計算了。這裏是已經計算好的頁碼排列,希望有便於大家製作材料:
第二種:邊上裝訂

小冊子的大小:A6 (A4的4分1)
WORD文件頁面設置:A6 (A4的四分之一)
打印方法:雙面
裁剪:把A4紙一開四 (雙面打印之後再裁)
注意:因為一面A4紙是打4頁(又是正反兩面,合起來一張A4紙打8頁),所以排版時最好是8的倍數,便於處理,如實在不夠,要在文件的末尾增加空白頁來湊足。
第一種:騎馬訂方式
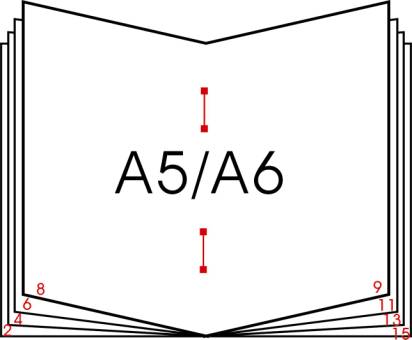
小冊子的大小:A5 (A4的一半)
WORD文件頁面設置:A5 (A4的一半)
打印方法:雙面
裁剪:不需要。在A4紙上雙面打印之後,按頁碼順序排好,從中線直接裝訂再對折成冊。
注意:因為一面A4紙是打2頁(又是正反兩面,合起來一張A4紙上打4頁),所以排版時最好是4的倍數,便於處理,如實在不夠,要在文件的末尾增加空白頁來湊足。
小冊子的大小:A5 (A4的一半)
WORD文件頁面設置:A5 (A4的一半)
打印方法:雙面
裁剪:不需要。在A4紙上雙面打印之後,按頁碼順序排好,從中線直接裝訂再對折成冊。
注意:因為一面A4紙是打2頁(又是正反兩面,合起來一張A4紙上打4頁),所以排版時最好是4的倍數,便於處理,如實在不夠,要在文件的末尾增加空白頁來湊足。
總頁數
|
打印頁碼
|
4
|
4,1,2,3
|
8
|
8,1,2,7,6,3,4,5
|
12
|
12,1,2,11,10,3,4,9,8,5,6,7
|
16
|
16,1,2,15,14,3,4,13,12,5,6,11,10,7,8,9
|
20
|
20,1,2,19,18,3,4,17,16,5,6,15,14,7,8,13,12,9,10,11
|
24
|
24,1,2,23,22,3,4,21,20,5,6,19,18,7,8,17,16,9,10,15,14,11,12,13
|
28
|
28,1,2,27,26,3,4,25,24,5,6,23,22,7,8,21,20,9,10,19,18,11,12,17,
16,13,14,15 |
32
|
32,1,2,31,30,3,4,29,28,5,6,27,26,7,8,25,24,9,10,23,22,11,12,21,
20,13,14,19,18,15,16,17 |
36
|
36,1,2,35,34,3,4,33,32,5,6,31,30,7,8,29,28,9,10,27,26,11,12,25,
24,13,14,23,22,15,16,21,20,17,18,19 |
40
|
40,1,2,39,38,3,4,37,36,5,6,35,34,7,8,33,32,9,10,31,30,11,12,29,
28,13,14,27,26,15,16,25,24,17,18,23,22,19,20,21 |
小冊子的大小:A6 (A4的四分之一)
WORD文件頁面設置:A6 (A4的四分之一)
打印方法:雙面
裁剪:在A4紙上雙面打印之後,從長邊的中間橫著裁成兩份,將各份按頁碼順序排好後,從中線裝訂再對折即可。
注意:因為一面A4紙是打4頁(又是正反兩面,合起來一張A4紙打8頁),所以排版時最好是8的倍數,如實在不夠,要在文件的末尾增加空白頁來湊足。
WORD文件頁面設置:A6 (A4的四分之一)
打印方法:雙面
裁剪:在A4紙上雙面打印之後,從長邊的中間橫著裁成兩份,將各份按頁碼順序排好後,從中線裝訂再對折即可。
注意:因為一面A4紙是打4頁(又是正反兩面,合起來一張A4紙打8頁),所以排版時最好是8的倍數,如實在不夠,要在文件的末尾增加空白頁來湊足。
總頁數
|
打印頁碼
|
8
|
8,1,6,3,2,7,4,5
|
16
|
16,1,14,3,2,15,4,13,12,5,10,7,6,11,8,9
|
24
|
24,1,22,3,2,23,4,21,20,5,18,7,6,19,8,17,16,9,14,11,10,15,12,13
|
32
|
32,1,2,31,30,3,4,29,28,5,6,27,26,7,8,25,24,9,10,23,22,11,12,21,
20,13,14,19,18,15,16,17 |
40
|
40,1,2,39,38,3,4,37,36,5,6,35,34,7,8,33,32,9,10,31,30,11,12,29,
28,13,14,27,26,15,16,25,24,17,18,23,22,19,20,21 |
48
|
48,1,46,3,2,47,4,45,44,5,42,7,6,43,8,41,40,9,38,11,10,39,12,37, 36,13,34,15,14,35,16,33,32,17,30,19,18,31,20,29,28,21,26,23,22, 27,24,25
|
56
|
56,1,54,3,2,55,4,53,52,5,50,7,6,51,8,49,48,9,46,11,10,47,12,45, 44,13,42,15,14,43,16,41,40,17,38,19,18,39,20,37,36,21,34,23,22, 35,24,33,32,25,30,27,26,31,28,29
|
64
|
64,1,62,3,2,63,4,61,60,5,58,7,6,59,8,57,56,9,54,11,10,55,12,53, 52,13,50,15,14,51,16,49,48,17,46,19,18,47,20,45,44,21,42,23,22, 43,24,41,40,25,38,27,26,39,28,37,36,29,34,31,30,35,32,33
|
72
|
72,1,70,3,2,71,4,69,68,5,66,7,6,67,8,65,64,9,62,11,10,63,12,61, 60,13,58,15,14,59,16,57,56,17,54,19,18,55,20,53,52,21,50,23,22, 51,24,49,48,25,46,27,26,47,28,45,44,29,42,31,30,43,32,41,40,33, 38,35,34,39,36,37
|
第二種:邊上裝訂
小冊子的大小:A6 (A4的4分1)
WORD文件頁面設置:A6 (A4的四分之一)
打印方法:雙面
裁剪:把A4紙一開四 (雙面打印之後再裁)
注意:因為一面A4紙是打4頁(又是正反兩面,合起來一張A4紙打8頁),所以排版時最好是8的倍數,便於處理,如實在不夠,要在文件的末尾增加空白頁來湊足。
打印方式1:一次打印兩個小冊子
用此方法打印一次必須同時打印兩個小冊子,優點是A6文件的頁碼順序無需計算、更改,按順序打印即可。用A4紙打印,一頁A4紙是打4頁,正反兩面打印相同內容。由於打印反面時左右會對調,所以第一頁的背面會打印出第二頁。打印完成後,用切紙刀裁成A4的四分之一大,從邊上裝訂成冊。
用此方法打印一次必須同時打印兩個小冊子,優點是A6文件的頁碼順序無需計算、更改,按順序打印即可。用A4紙打印,一頁A4紙是打4頁,正反兩面打印相同內容。由於打印反面時左右會對調,所以第一頁的背面會打印出第二頁。打印完成後,用切紙刀裁成A4的四分之一大,從邊上裝訂成冊。
打印方式2:一次打印一個小冊子
總頁數
|
打印頁碼
|
8
|
1,3,5,7,4,2,8,6
|
16
|
1,3,5,7,4,2,8,6,9,11,13,15,12,10,16,14
|
24
|
1,3,5,7,4,2,8,6,9,11,13,15,12,10,16,14,17,19,21,23,20,18,24,22
|
32
|
1,3,5,7,4,2,8,6,9,11,13,15,12,10,16,14, 17,19,21,23,20,18,24,22,25,27,29,31,28,26,32,30
|
40
|
1,3,5,7,4,2,8,6,9,11,13,15,12,10,16,14,17,19,21,23,20,18,24, 22,25,27,29,31,28,26,32,30,33,35,37,39,36,34,40,38
|
from:
http://big5.minghui.org/mh/articles/2002/9/13/36487.html